1. KCS Multivendor Marketplace Extension – User Manual
Last Updated: Sep 9, 2025
KCS Multi-Vendor Marketplace transforms any OpenCart store into a powerful online marketplace, similar to platforms like Etsy or eBay. With this extension, multiple sellers can register, manage their own profiles, and list products within your store.
As the store owner, you retain full control over approvals, orders, reviews, and settings, while vendors get an easy-to-use dashboard to handle their inventory and sales. This creates a scalable ecosystem where different sellers collaborate under one storefront, offering customers a wide variety of products—all managed seamlessly through KCS Multi-Vendor.
2. Installation of OpenCart Marketplace Extension
Purchase the OpenCart Multi-vendor Marketplace Module from the opencart.com. You’ll get the following files:
1. Zipped File containing the source code of the module
2. User Manual
Follow the steps mentioned below in order to install the open cart Multivendor Marketplace plugin in your store:
1. Extract the downloaded ZIP file. Make sure that vQmod is already installed, otherwise the plugin will not function. After extraction, you will see the folders as shown in the image below:

2. Copy all the files and folders of the zip file in the Root Directory of the site.
3. The admin can access the OpenCart Multi-Seller Marketplace extension by navigating to Admin Panel → Extensions. To install, simply click the Install button next to the module.
4. The OpenCart Marketplace extension has been installed successfully and is ready for use. You can access it by navigating to Admin → Main Menu → OpenCart Marketplace as shown in the image below.
Admin Panel
The KCS Multivendor Marketplace extension provides a wide range of configuration and management options to efficiently operate and customize your online marketplace.
Choose Extension from Module list

Install and enable KC vendor modules

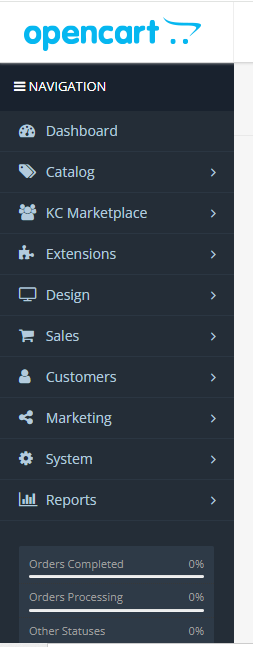
After installing and enabling the KCS Multivendor Marketplace extension, more than 12 main menu options appear in the left sidebar under the KC Marketplace settings.
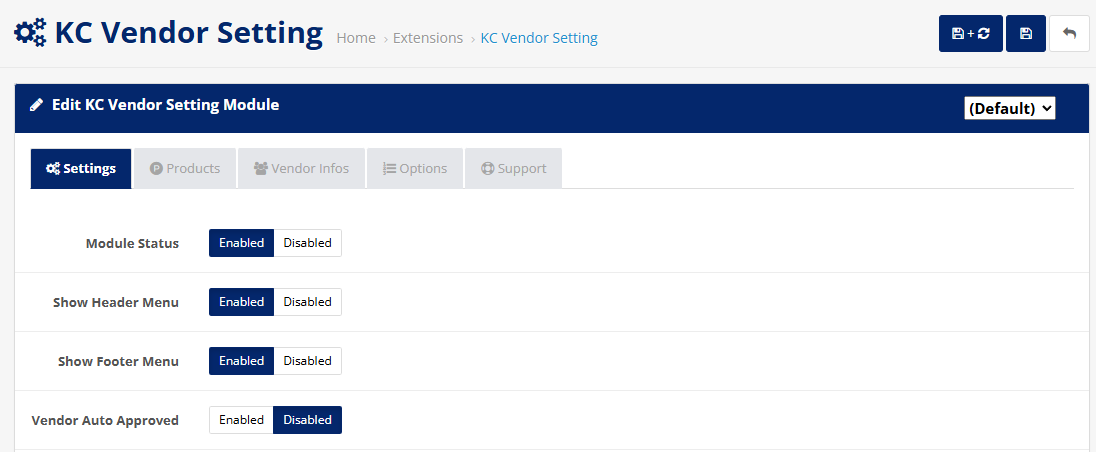
Marketplace Setting
The KC Vendor Setting Module allows the admin to configure general options for the KCS Multivendor Marketplace. These settings control how vendors interact with the marketplace and how their accounts are managed. This tab contains the core configuration options for enabling the module and controlling vendor visibility in the store.
-
- Module Status
- Enabled/Disabled
Activates or deactivates the entire KC Vendor Marketplace module.
-
- Show Header Menu
- Enabled/Disabled
Displays the vendor-related menu in the website header for quick access.
-
- Show Footer Menu
- Enabled/Disabled
Displays the vendor-related menu links in the website footer.
-
- Vendor Auto Approved
- Enabled/Disabled
If enabled, newly registered vendors are automatically approved without admin verification. If disabled, admin approval is required for vendor activation..
-
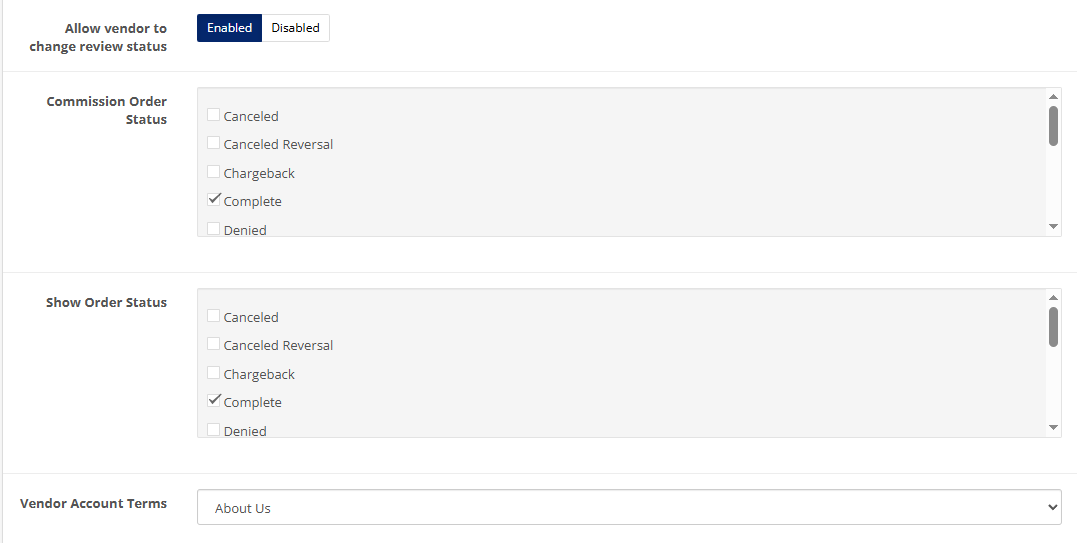
- Allow vendor to change review status
- Enabled/Disabled
When enabled, vendors can manage or change the status of product reviews (approve/deny) from their dashboard.
-
- Commission Order Status
Allows the admin to select which order statuses will trigger vendor commission calculation.
Example: If Complete is selected, commission is calculated only when an order is marked as Complete.
-
- Show Order Status
Determines which order statuses vendors can view in their order list.
Example: Selecting Complete means vendors can view only orders that have been completed.
-
- Vendor Account Terms
Dropdown menu to select a CMS page (like About Us, Terms & Conditions, etc.
This page is displayed as the “Terms” vendors must agree to during registration.
- Product
-
- Automatic Approve Product
- Enabled/Disabled
This setting determines whether products are automatically approved upon submission. When set to "Disabled," each product must go through a manual approval process.
-
- Approved Product Status
- Enabled/Disabled
Defines the status a product will receive once it is approved by the system or administrator.
-
- Product Default Approve Status
- Enabled/Disabled
Description: This is the default status assigned to a product when it is first submitted by a vendor.
-
- Vendor Cannot Edit Product After Which Status
- Selected Options:
Description: Specifies the statuses after which vendors are no longer allowed to make edits to their product listings. In this case, once a product is either banned or hard rejected, the vendor cannot modify it further.
- Vendor Info
-
- Show Vendor Name
- Enabled/Disabled
Description: Displays the vendor's name on their public profile or store page.
-
- Show Vendor E-Mail
- Enabled/Disabled
Description: Makes the vendor's email address visible to users.
-
- Show Vendor Telephone
- Enabled/Disabled
Description: Displays the vendor's phone number for customer contact.
-
- Show Vendor Address
- Enabled/Disabled
Description: Shows the vendor's physical or business address.
-
- Show Vendor Profile Image
- Enabled/Disabled
Description: Allows display of the vendor's profile or store image/avatar.
-
- Show Vendor Review Rating
- Enabled/Disabled
Description: Displays vendor ratings based on customer reviews.
-
- Show Vendor Social Icons
- Current Selections
Description: Enables the display of social media icons on the vendor's profile, linking to their respective social accounts.
- Options
-
- Products per Page for Vendor Pages
Description: Sets the number of products displayed per page on each vendor’s store page
-
- Store List per Page
Description: Specifies how many vendor stores appear per page in the store listing section
-
- Store Products List per Page
Description: Determines the number of products shown per page in the product listings of a store.
-
- Store Reviews List per Page
Description: Controls how many customer reviews are shown per page on the vendor review section.
-
- Approval Status History per Page
Description: Limits the number of approval history entries displayed per page for a vendor's products.
- Vendor Info Page Display Sizes
-
- Store Products Size (W x H)
Description: Sets the display size of each product image on the vendor's store page.
-
- Store Logo Size (W x H)
Description: Sets the size for the vendor's store logo.
-
- Store Banner Size (W x H)
Description: Sets the display dimensions of the vendor's banner image.
-
- Profile Image Size (W x H)
Description: Determines the size of the vendor’s profile/avatar image.
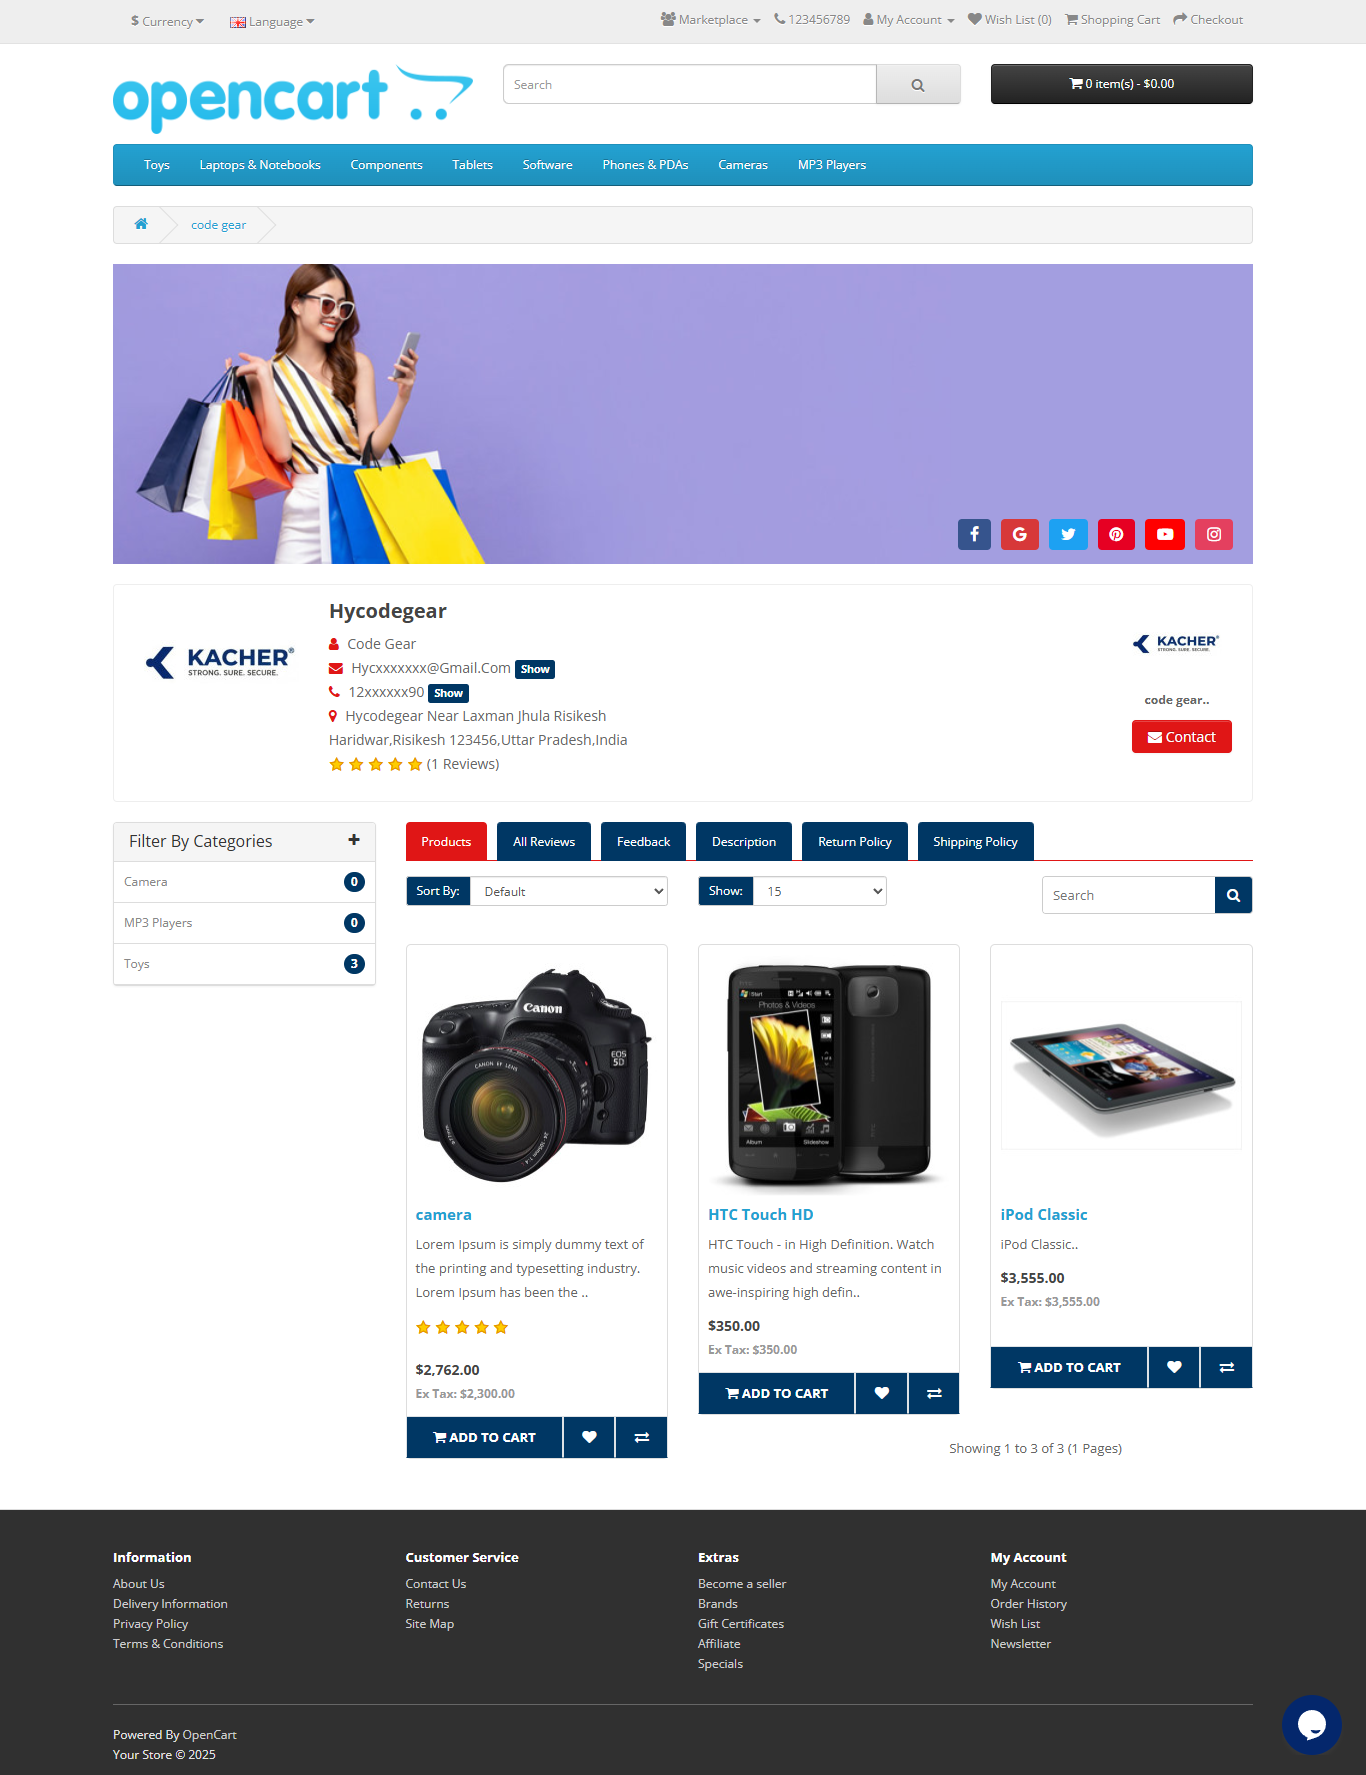
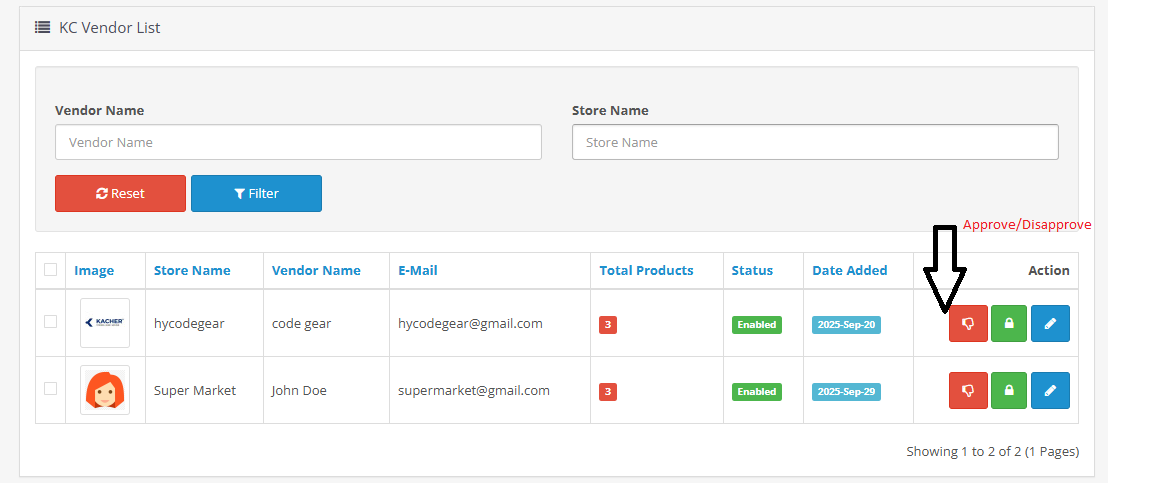
Manage Marketplace
View and manage all registered sellers...
This section of the KCS Multivendor Marketplace extension displays a comprehensive list of all approved sellers in the store. From here, the admin can easily manage, edit, or monitor vendor activities.
Marketplace catalog
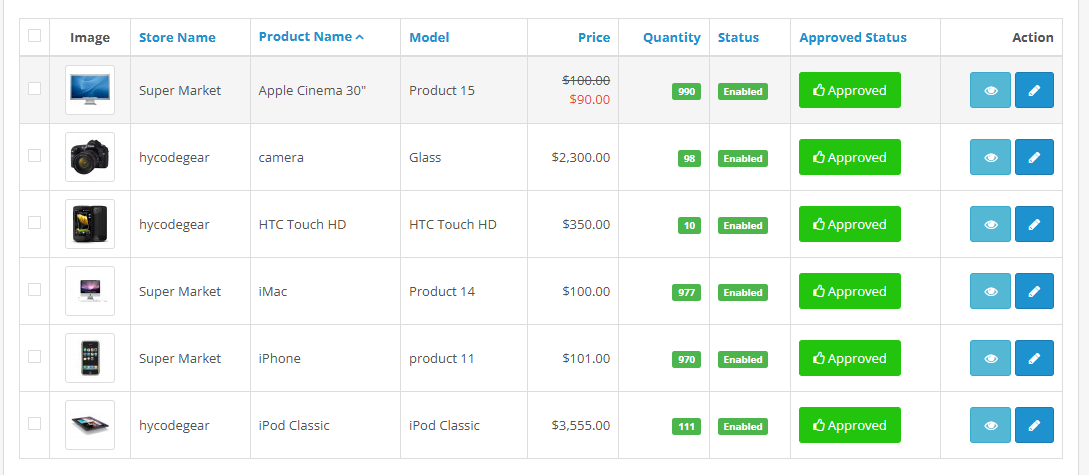
Product
Product List – Manage, Add, Edit & Approve Products
The Product List page allows administrators or vendors to view, add, edit, and manage products efficiently. It provides an overview of all listed items with key details such as pricing, stock levels, and approval status
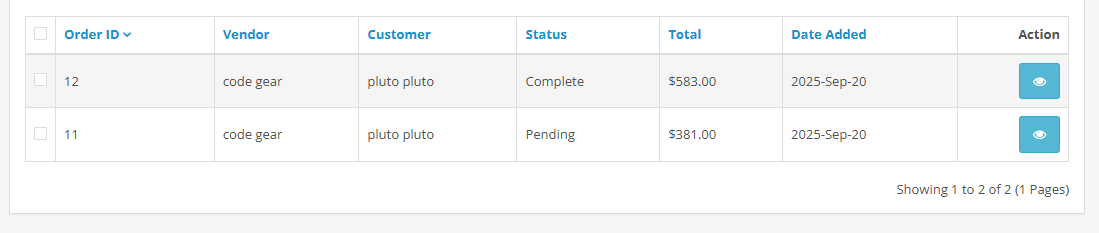
Orders
The store admin can view or edit the orders by clicking on the View and Edit buttons respectively.
The following window will display if admin clicks the edit button. Admin can make the changes in all the fields as required
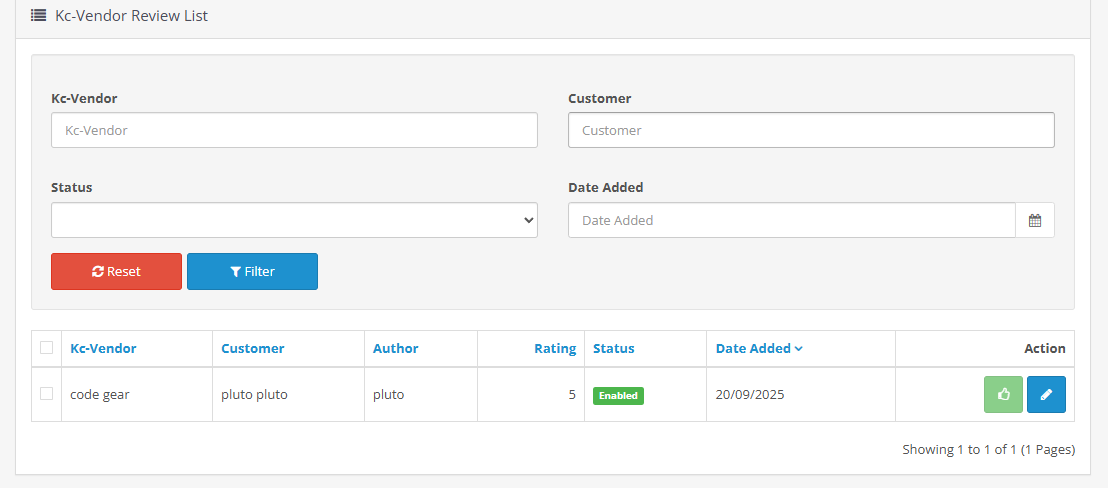
Reviews
The admin can view the review received on seller product in the Product Review Tab of their Dashboard. All the reviews received will list as shown in the image
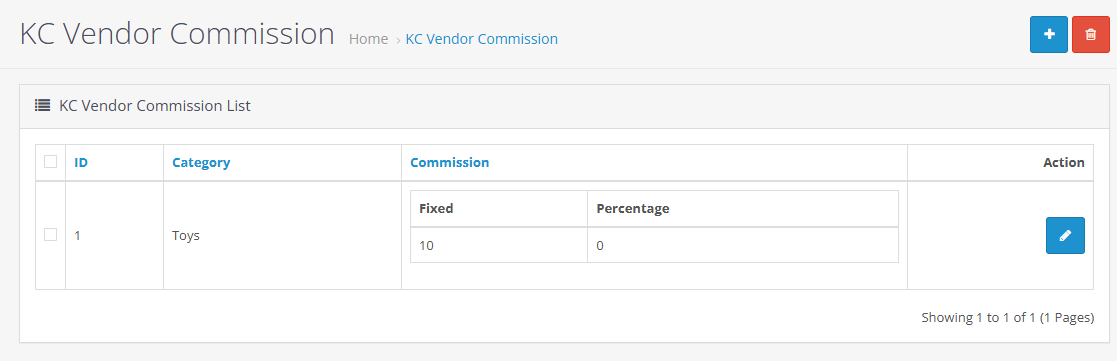
Commission
The Seller Commission Setting section in the KCS Multivendor Marketplace extension allows the admin to define and manage the commission structure for vendors. This configuration helps control how much commission the admin earns from each seller’s sales
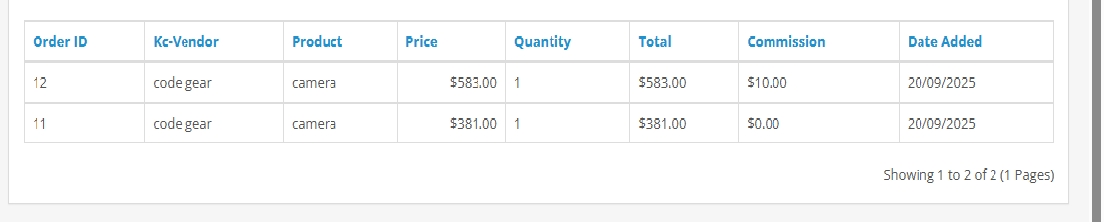
Commission Report
The Commission Report section in the KCS Multivendor Marketplace provides a detailed summary of commissions earned by the admin from vendor sales. It displays each seller’s total sales, commission amount, and payable balance.
This report helps the admin track overall earnings, monitor vendor performance, and manage payouts efficiently
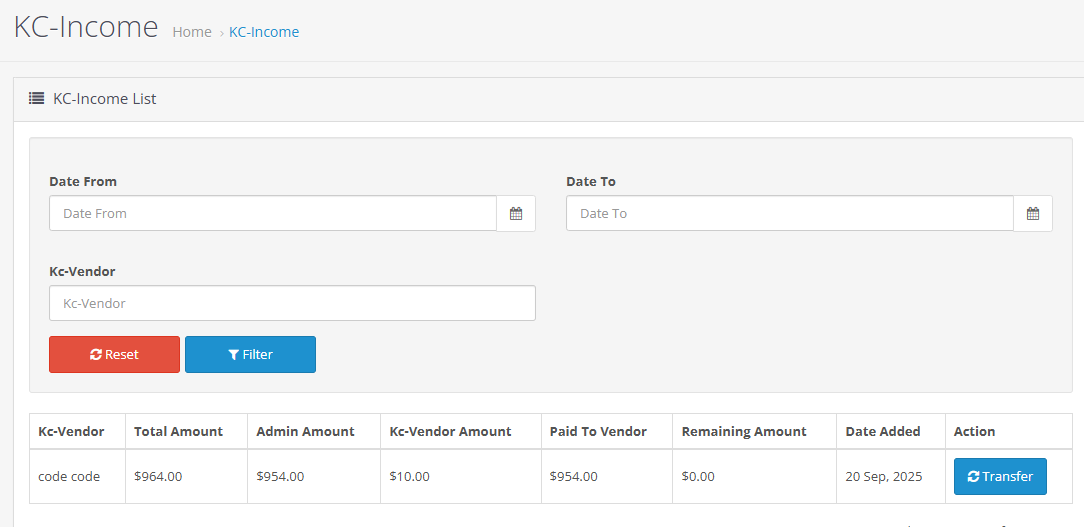
Income
The Seller Earning List section displays each vendor’s total sales, commission deductions, and final payable earnings. It gives the admin a clear overview of the seller’s financial summary and transaction history.
The Transfer Option allows the admin to manage and record payments made to vendors. Admins can mark payments as completed using various payment methods such as bank transfer, PayPal, or cheque, ensuring accurate tracking of all vendor payouts within the marketplace.
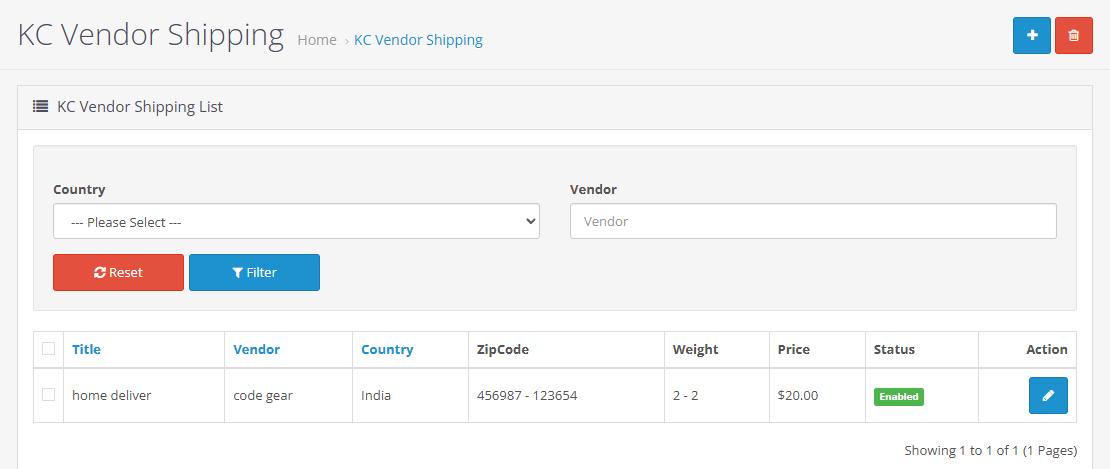
Shippiing Method
The KC Vendor Shipping page allows the admin to create, edit, and delete shipping methods for vendors. This ensures consistent shipping options and pricing across all sellers in the marketplace.
Admin Workflow Summary
Add Shipping Method
Click the blue “+” button → Select vendor and country → Enter zip code range, weight, and price → Save.
Edit Shipping Method
Click the Edit (pencil) icon → Update any field → Save changes.
Delete Shipping Method
Click the Delete (trash) icon → Confirm deletion to remove the method.
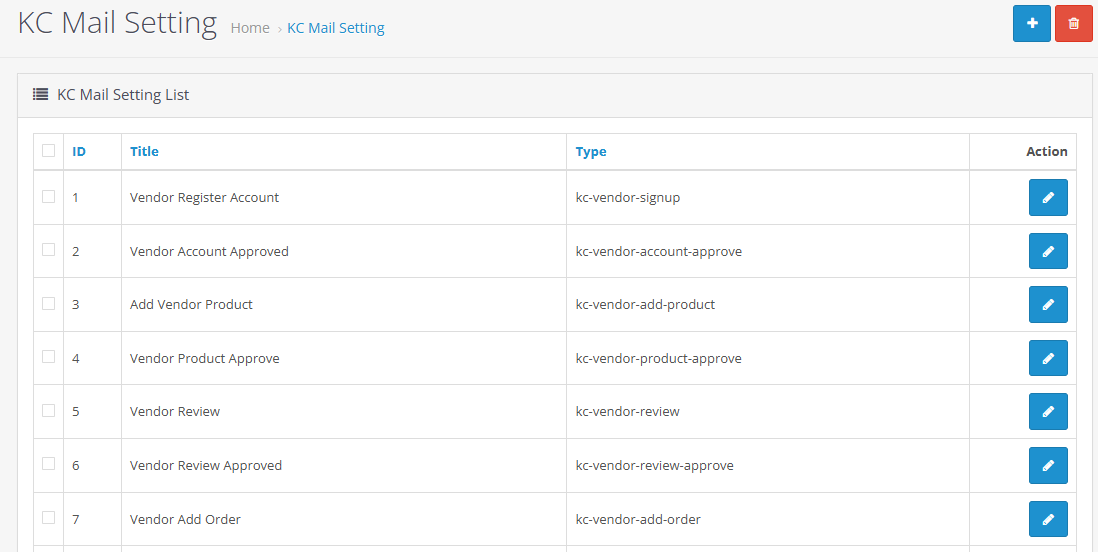
Mail Template
The KC Vendor Shipping page allows offers multiple pre-designed email templates for various scenarios.
The store admin can even edit the templates if required by clicking on the Edit button
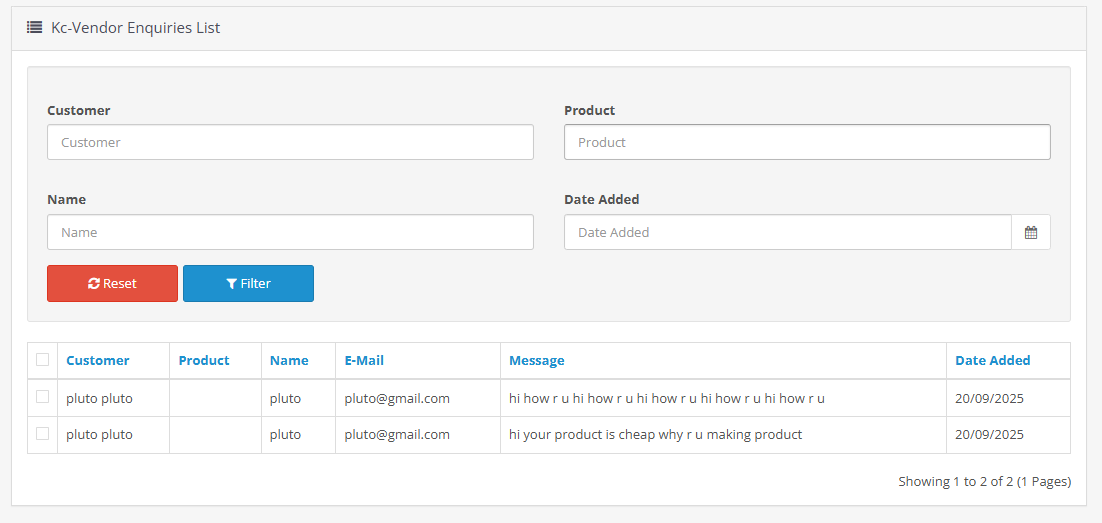
Vendor enquiries
The Enquiry List section allows the admin to view and manage all customer or vendor enquiries submitted through the store.
Admins can track messages, respond to queries, and maintain communication records.
Frontend
Vendor SignUp
The vendors can easily register as a seller of the site by filling a simple registration form. In order to register as a seller.

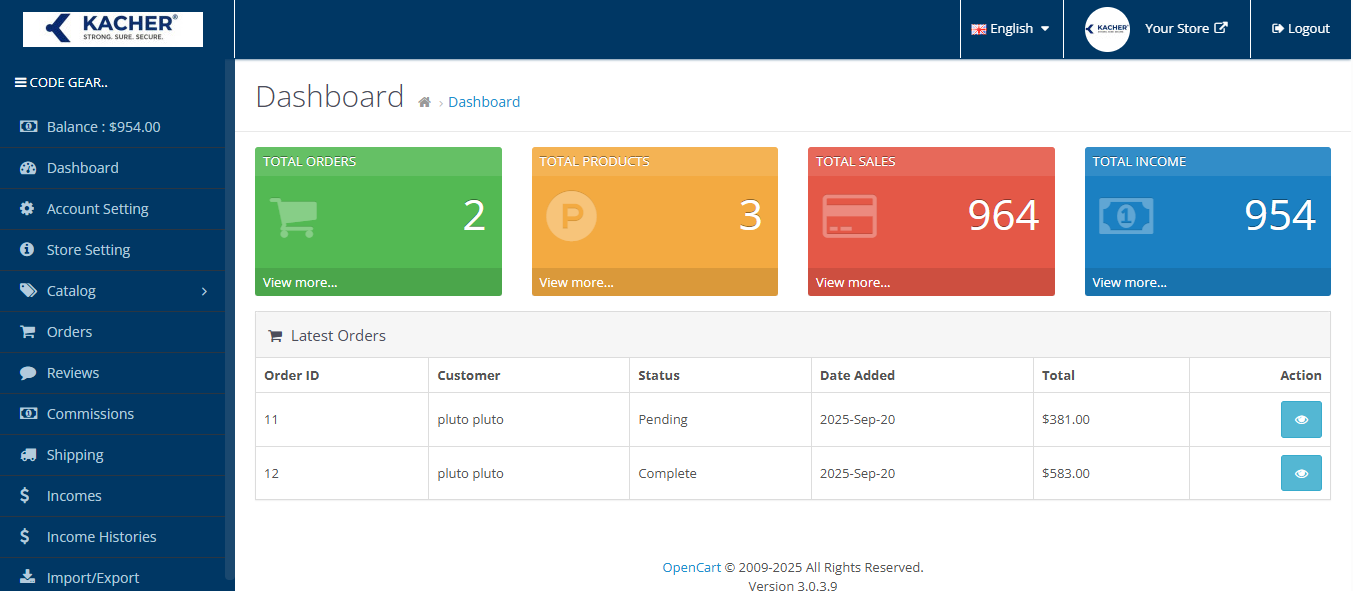
Vendor Dashboard
Once the registration is complete and the Vendor’s account approves from the back-end of the kcs Multi-vendor Marketplace, the Vendor gets access to the Dashboard.
Vendor Shop
The seller can Acess own shop feature